<<< Useful Guides
SonicWall TZ205 VPN Setup for OSX
In this post I am going to talk about creating a VPN tunnel through your SonicWall firewall that works without the need for other 3rd party software
If your client is a Windows machine then this is a relatively easy task, but if like me you use OSX and iOS as your primary devices then it can be a bit more of a challenge.
Configure SonicWall L2TP VPN Server
First log onto your SonicWall and navigate to the Network ➟ Address Objects section
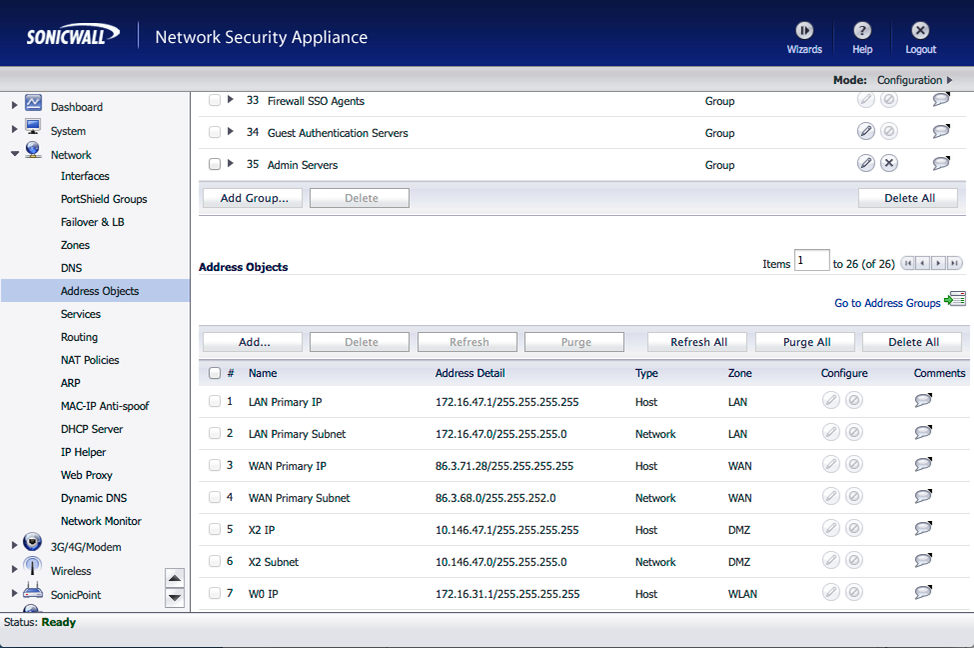
Then add the following Address Object by pressing the Add… button
| • | Name: | OSX L2TP SubNet |
| • | Zone Assignement: | VPN |
| • | Network: | [A subnet not currently in use] |
| • | Netmask: | 255.255.255.0 |
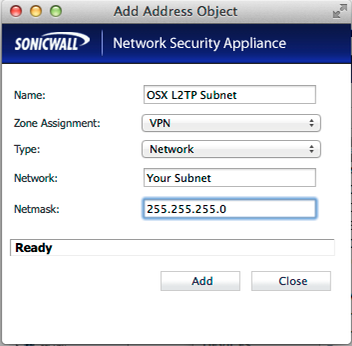
This is the new network subnet that we will assign purely for L2TP connections. It should NOT be a subnet range in use on your network.
Next navigate to the Users ➟ Settings and ensure that the Authentication method for login is set to Local Users

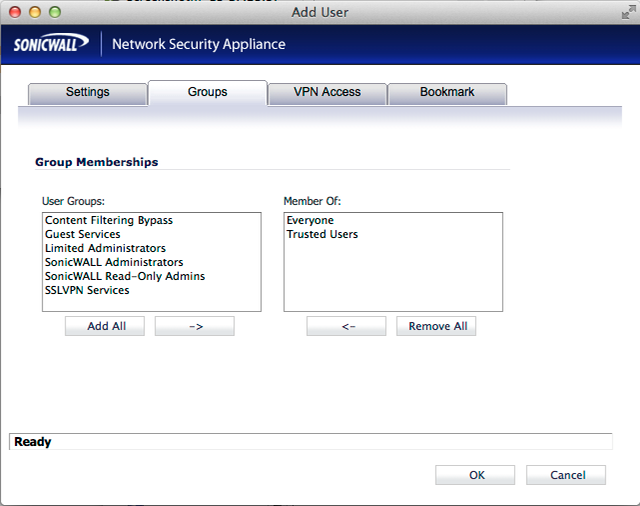
Then from the Local Users section press the Add User… Button and create some VPN users
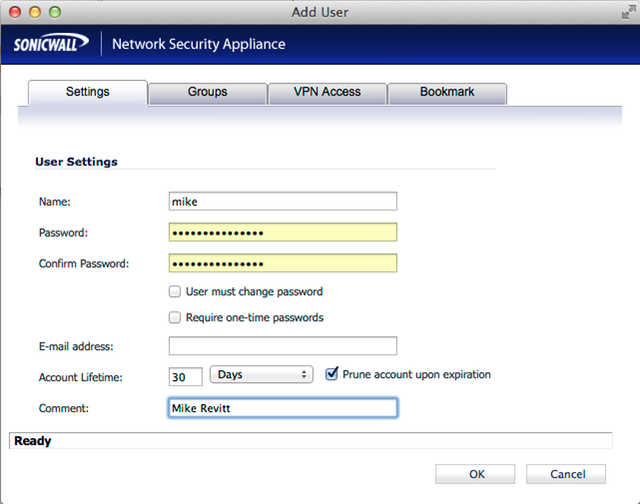
Setting account expiration is a good security habit that is recommended
Make sure that the new user is a member of the Trusted Users group
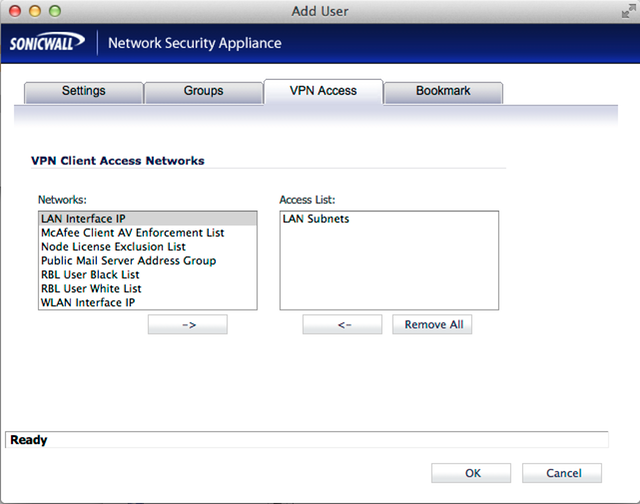
Before adding the LAN Subnets to the access List
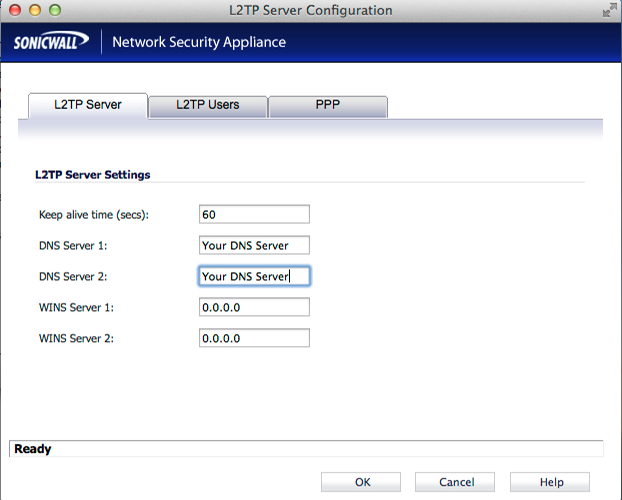
Then navigate to the VPN ➟ L2TP Server and enable the server then click the Configure… Button
On the L2TP Server tab set
| • | Keep alive time (secs): | 60 |
| • | DNS Server 1: | [Valid DNS Server - I use my SonicWall address] |
| • | DNS Server 2: | [Any other DNS Server you want to use] |
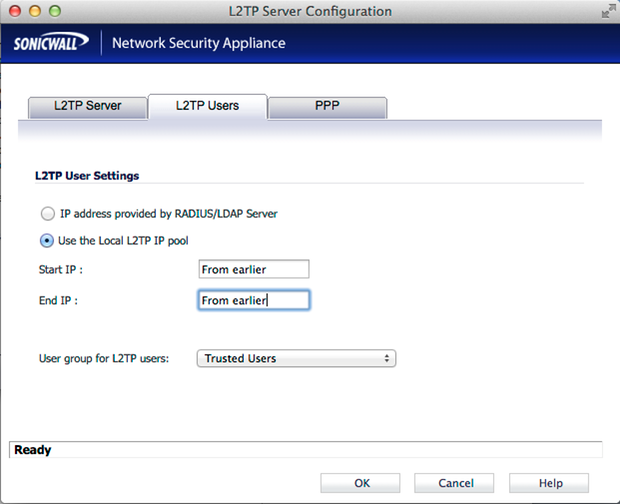
On the L2TP Users tab set
| • | Use the Local L2TP IP Pool: | True |
| • | Start IP: | [From the L2TP network you created earlier] |
| • | End IP: | [From the L2TP network you created earlier] |
| • | Use group for L2TP users: | Trusted Users |
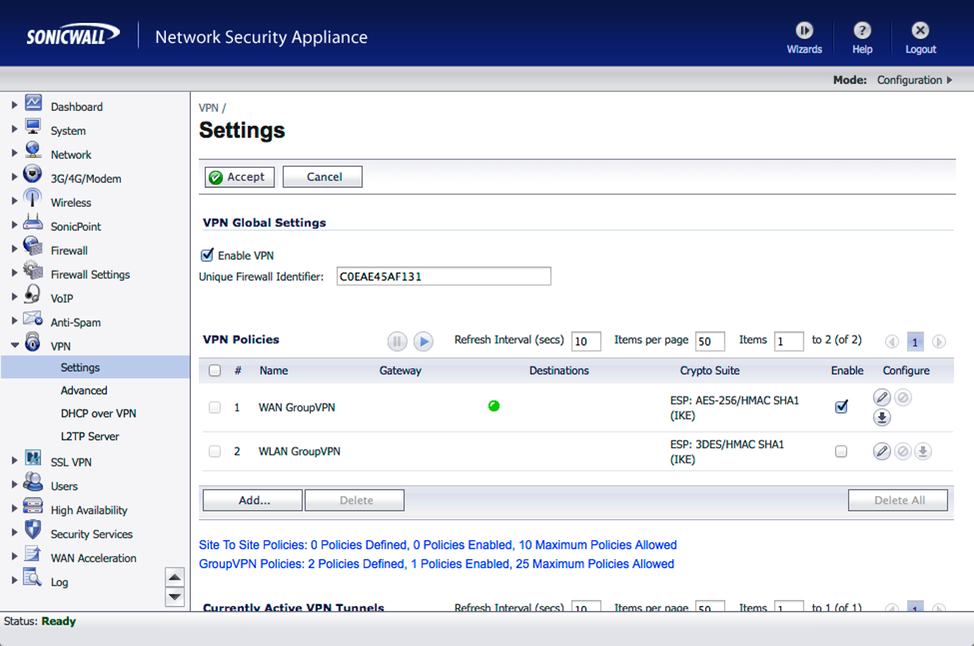
There is nothing to set on the PPP tab, so navigate to VPN ➟ Settings, you can leave the Unique Firewall Identifier as the default. To configure the WAN GroupVPN policy, press the Configure button.
Don’t forgetto Enable the VPN on this page, or it will not work.
On the General tab set:
| • | Authentication Method: | IKE using Preshared Secret |
| • | Name: | WAN GroupVPN |
| • | Shared Secret: | It's a Secret |
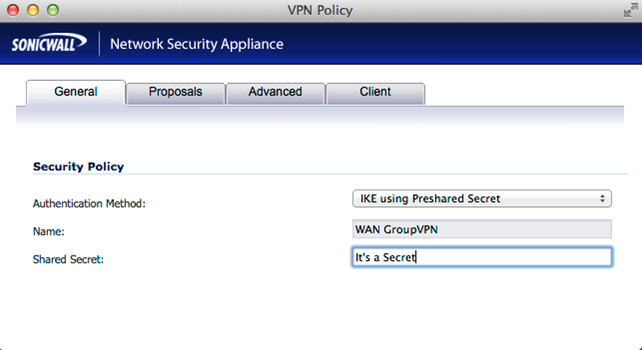
This is not my secret by the way 😀
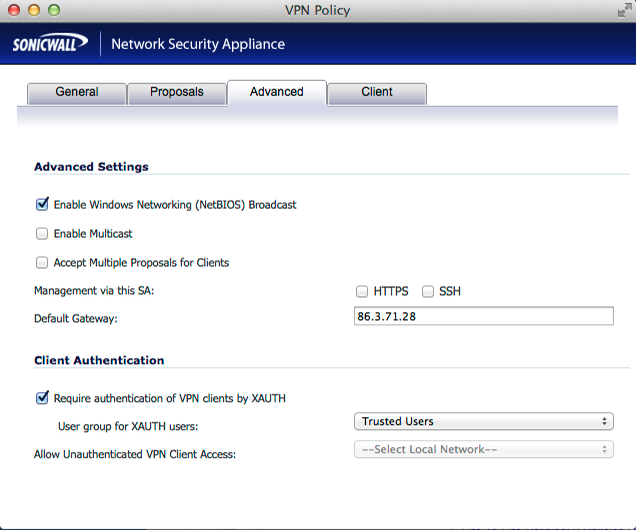
You can leave the Proposals tab as the defaults so skip to the Advanced tab and make the following changes
On the Advanced Tab set the gateway to be the address of your Sonicwall Appliance and make sure that you setup Client Authentication to Trusted Users
| • | ✔ | Enable Windows Networking (NetBIOS) Broadcast |
| • | Default Gateway: | [The Public address of your SonicWall appliance] |
| • | User group for XAUTH users: | Trusted Users |
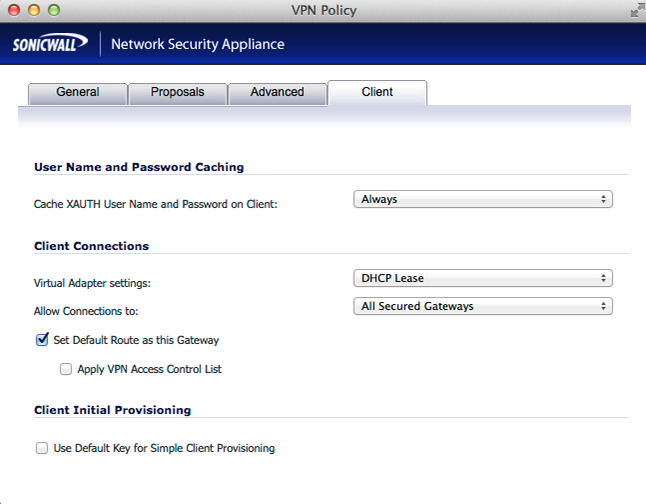
| • | Cache XAUTH User Name and Password on Client: | Always |
| • | Virtual Adapter settings: | DHCP Lease |
| • | Allow Connections to: | Your choice - This Gateway Only is more secure |
| • | ✔ | Set Default Route as this Gateway |
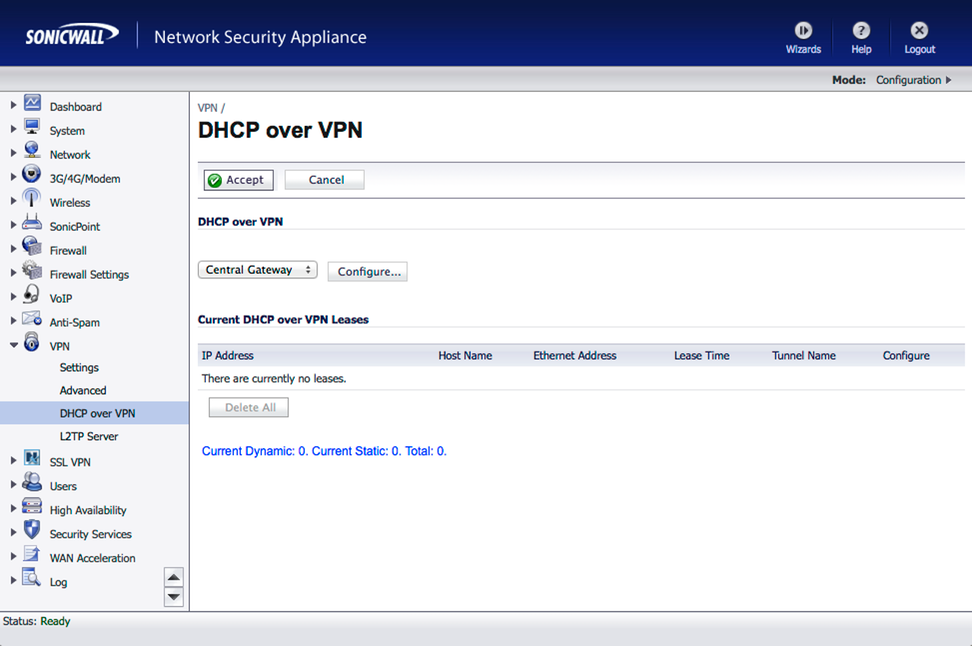
Next navigate to VPN ➟ DHCP over VPN, make sure that Central Gateway is displayed and press the Configure button
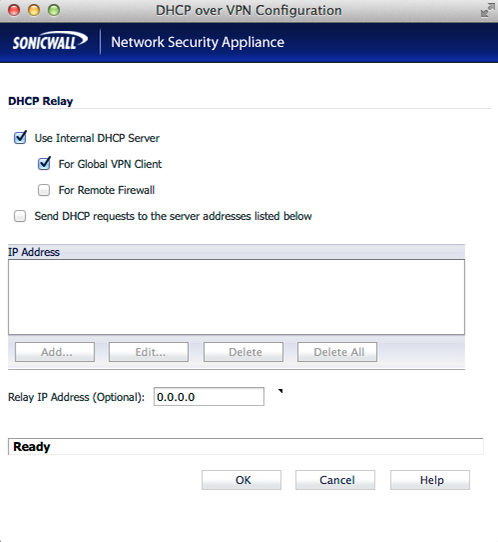
| • | ✔ | Use Internal DHCP Server |
| • | ✔ | For Global VPN Client |
Now we need to make some Firewall changes so navigate to Firewall ➟ Access Rules
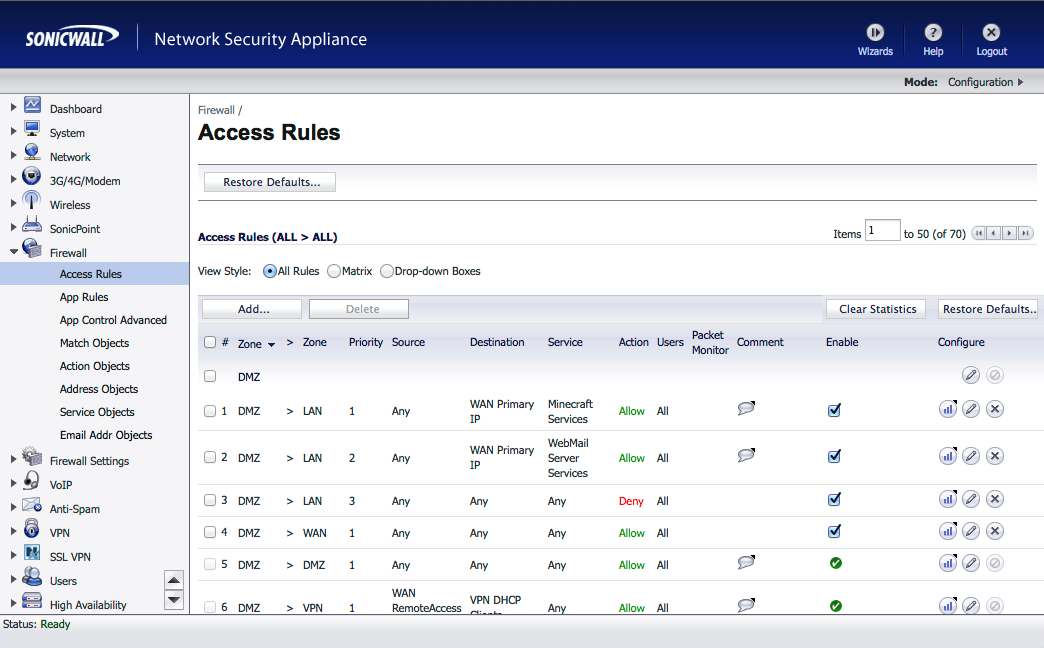
Press the Add buton to create a new rule and then enter the following information:
In the General tab
| • | Action: | Allow |
| • | From Zone: | VPN |
| • | To Zone: | WAN |
| • | Service: | Any |
| • | Source: | WAN RemoteAccess Networks |
| • | Destination: | Any |
| • | Users Allowed: | All |
| • | Schedule: | Always On |
| • | ✔ | Enable Logging |
| • | ✔ | Allow Fragmented Packets |
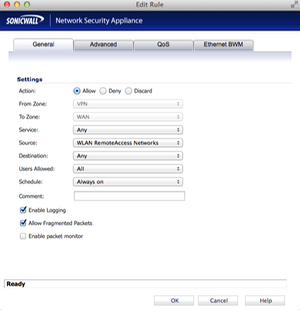
All the other tabs can be left at their default values.
Next navigate to Network ➟ NAT Policies.
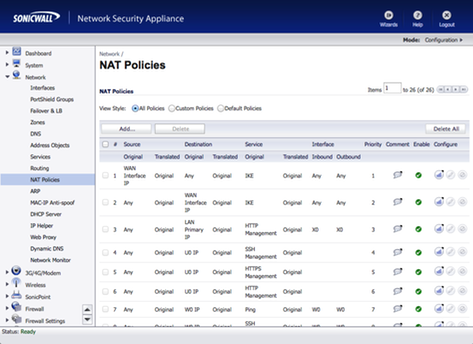
Press the Add button to create a new Policy and enter the following information in the General tab
| • | Original Source: | OSX L2TP SubNet - Or whatever you created earlier |
| • | Trusted Source: | WAN Primary IP |
| • | Original Destination: | Any |
| • | Translated Destination: | Original |
| • | Original Service: | Any |
| • | Translated Service: | Original |
| • | Inbound Interface: | Any |
| • | Outbound Interface: | X1 - Which should be your WAN Interface |
| • | ✔ | Enable NAT Policy |

You should now have a working VPN configuration that is accessible from your iPhone, iPad or OSX MacBook.
Configure MacBook Pro to Connect to SonicWall L2TP VPN Server
The next steps are to create a VPN link on your MAcBook Pro to connect to this VPN Link
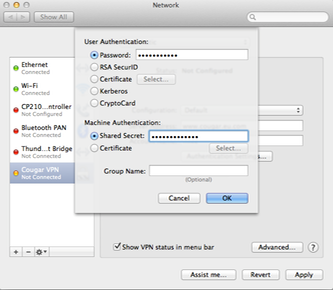
The first thing you need to do is locate your Network Configuaration. This can be done a number of ways but probably the easiest to explain is to click on Spotlight, this is the Magnifying Glass at the top right of your screen, and type in “network“, without the quotes. Near the top you should see System Preferences: Once there press the + button on the botton left corner to create a new VPN configuration and enter the following information This should leave you with the following page Enter the following information< That’s it, now all that remains is to press Connect and you are connected to you home network. Network, this is the appllication we want so select that.
• Interface: VPN • VPN Type: L2TP over IPSec • Service Name: [Name of your choice] 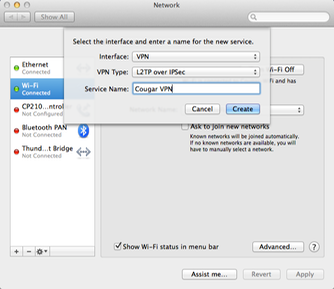
• Configuration: Default • Server Address: [The Public address of your SonicWall appliance] • Account Name: [The username you created earlier] 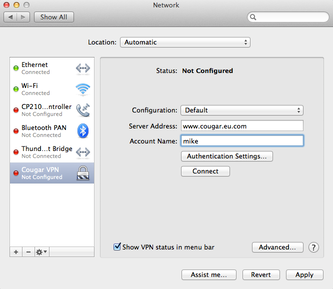
• Password: [Whatever you entered when you created the user] • Shared Secret: It's a Secret